Step by step photo guide to decorating novelty cakes

Saturday, 22 December 2012

Baking Xmas gift guide

Uh oh.... there's only a few days to go until Christmas. I felt it festive to build a small bakers gift guide.... for whether you're trying to figure out what to buy for your baking enthusiast friend, or come up with ideas for your own wish list (which you can then post to your friends/dearest ones/people that buy you stuff). For those of you who don't bake or are new to baking...I even added pictures!!! :)

1. Anyone that's ever had to stand in their kitchen and cut out 20 separate letters by hand will understand the importance of alphabet cutters..... in all shapes and sizes! You can pick these up in all sorts of craft shops, they don't even have to be for fondant, Play-doh cutters work just as well!

2. When I first started baking I was constantly frustrated that I was having to douse my kitchen benches with icing sugar just to make sure the fondant didn't stick. Nobody ever told me about fondant mats... I learnt the hard way and discovered them for myself, months down the line.

3. Pretty storage tins can be expensive and, as a result, we bakers tend not to splash our cash on these and buy more practical things instead. They're a delight to receive (well, in my opinion anyways!)

4. Grocery store food colourings just don't work as well when it comes to hardcore baking and decorating. These gel pots are super cheap and you can pick them up in cake supply stores or on Amazon and Ebay! They last ages as well!

5. 'Hello Cupcake' book is a brilliant book for starters wanting to get creative with cupcakes. They have 2 follow up books for those that love it! However, I did find that a lot of the decorating involved using US?Canadian candies that I found tricky to source in the UK (and had to substitute).

6. Maybe it's just me, but anything sent out into the world by king of cakes, Duff Goldman has GOT to be awesome!! The 'Ace of Cakes' TV show cake  mastermind launched his own range recently.... I love his cupcake tattoos... a we bitty pricey for what they are, but a cupcake fan's delight!

7. Got a bit of moolah to be splashing out on you cake loving loved one... you can't go wrong with the funky designs of the Kenwood stand mixers. I'd die if someone gave me one of these bad boys! (hint hint)

8. Cake turn tables are not essential for me (I can spin a board around by myself), but it would make a great little gift because, as with the cake tins, its perhaps not something that new bakers would buy themselves at first! It's a treat.

9. Wooden rolling pins are cheap as chips... so I tend to find new bakers buying these to cut costs. HOWEVER, these wooden pins tend to leave a grainy imprint on fondants. A marble/plastic pin will resolve that and make us feel really happy that you just paid so much money on a big lump of stone for us! :)
Read More

Tuesday, 11 December 2012

Mini modelling tutorials

Being away from home shouldn't stop me baking right? urm... riiiight. Have you tried working with fondant in 40 degree heat? (that's if you can find it in the first place). So, with that in mind, I'm going to treat you guys to a couple of cute, quick AND easy fondant tutorials to keep you busy.... I've even thrown Santa in for good measure :)

Being so near Christmas, it would have been rude not to post this brilliant Santa step-by-step tutorial from www.clayus.com. So they're using modelling clay? fondant will work just the same!

Because everyone loved Pooh bear! Even if you didn't like that whiny little Piglet thing! Cute little tutorial from More-ish cupcakes: http://www.facebook.com/#!/MoreishCupcakes?fref=tsake

I love the idea of this cake topper because it shows you how to include a photograph holder... cupcakes with your photo anyone? Easy tutorial from http://glinki.net/

Those clever people at ClayUs.com impressed me so much that I'm giving them two mentions today! I've never really got the 'SpongeBob' trend, but even way into their late 20's...most of my friends (especially the males) do!!!

Read More

Monday, 3 December 2012

City Sights cake


So for this cake I'm gonna try a new step-by-step format, so please feed back your thoughts on the layout peeps!!!
The hard bit of this cake wasn't the cake itself, but the painting. You need an arty hand (or someone that has one).
 
YOU WILL NEED
1 Round cake
Ready to roll fondant
Black powdered food colouring
Vodka!!!
Red and Green gel colouring
 
 
 Step 1: Roll out your white fondant ( I do this on a white plastic mat so that it doesn't stick to my bench). Once rolled, I smooth it out with a fondant smoother.
 
Step 2: Cover your cake with your rolled fondant.
 
Step 3: Trim your fondant and smooth it out once again with the smoother.
 
Step 4: Mix your black powdered food colouring with a teeny tiny bit of vodka to make your edible paint. This is a bit of a trial and error occasion. If you add too much vodka your powder will be too watery, make your fondant soggy and have a watered down colour. If you don't add enough water, your paint will be too thick and dry to use.... basically, you're looking for a happy medium. Take my advice and do a little trial on a scrap of fondant first. Leave these to dry (or your paint will run down the fondant once it's sitting vertically). Once dry, cut an outline near the image and attach to the sides of your cake with fondant glue (or water if you don't have any).
 
Step 5: Use a thin paint brush to paint on your design. I used google images to give me ideas/inspiration for the city in the brief (in this case, Rome). 
 
Step 6: Make some red fondant with your red gel colouring and roll out and cut into medium sized circles.
 
Step 7: Use fondant tools to thin out/pattern the edges of the circles. These are going to be used to make petals for the flowers of your cake.
 
Step 8: Arrange your petals into a flower (I wanted to make my flowers look a little wilted, like they'd fallen... but for a great full rose tutorial try this youtube clip: http://www.youtube.com/watch?v=Z5ng82WxvlM)


Read More

Friday, 16 November 2012

The cute EDF guy

So... this wee guy was something I did a while ago for a birthday order. It was actually one of my easier cakes...but the result was great!!!


  You need:

 Round sponge cake x2
 Butter cream
 Filling of your choice

 Ready roll fondant
 Black fondant
 Orange gel colouring
 Cake board


Bake your cakes with excess batter in the centre so that they have a rise in the middle. Most bakers will find they get a slight rise the in middle anyway when they bake. Slice the tops of both round cakes. Keep the cut offs and use them to make a point at the top(you can also cheat and add height to the centre with these cut offs!)

Stick your cakes together with a bit of butter cream in the centre and then crumb coat them. This is where you add a layer of butter cream to the cake to stops any crumbs from moving. Cover with cling film and leave in the fridge for at least 30mins.
 
Remove from fridge, transfer to your cake board and add your second coat of butter cream. This coat will ensure that your fondant goes on smooth.
Mix your orange gel colouring into your ready to roll fondant. Layer this on top of your cake and use a fondant smoother (see equipment blog post) to even out any lumps or bumps.
 
Cut out two circles of white for eyes and attach with water (or fondant glue if you have it). Cut two smaller circles out of black fondant and add to the top of the white. Model a small triangle for the nose, and set below the eyes.


Read More

Wednesday, 24 October 2012

http://iwanttomakethatcake.tumblr.com/

It's been a little quiet on the thizizhowibake scene. Being away from home is making it tough to bake, but I have a new post coming soon!

In the meantime, check out my new sister blog on tumblr;
http://iwanttomakethatcake.tumblr.com

The new blog is a lighter 'mood board' style blog (with small tips) aimed at peeps that are just looking for a bit of inspiration rather than a full step by step guide.

This week's theme...HALLOWEEN of course!!!
Read More

Wednesday, 12 September 2012

Double Dino Cupcake Cake

Righty, so I'm throwing you in at the deep end here... but everyone's gotta start somewhere with fondant right? urm...right.

I've chosen this cake as it's my best selling one. It took a while the first time I did it (getting colours right, fiddling with shapes etc), but once you done it once you can tinker with it so that it suits anyone.... SO HERE GOES....

YOU WILL NEED

1 Cake board
1 round cake
2 cupcakes
Fondant
Green, blue, red, yellow, black colouring
Butter cream
Your chosen filling


Step 1: Make your cakes! You're gonna need a nice round cake and 2 cupcakes.

None of these need to look amazing as long as they taste good..you're going to be covering them.


Step 2: Cover your big cake in butter cream and then cover with cling film. 'Why?' you ask. You're doing a crumb coat. Leave in the fridge for an hour or so.

EXCITING FACT: A crumb coat will catch all of the messy crumbs on your cake so that the second layer of butter cream with be smooth and make your fondant look smoother.


Step 3: Take your crumb coated cake out of the fridge and put it on your cake board.  Do a second layer of butter cream.

EXCITING TIP: before you do your second coat,slip pieces of greaseproof paper under your cake edges. This will stop your cake board from getting messy and can be pulled out whenever you fancy.


Step 4: Roll out your green fondant for the main cover of the cake.

EXCITING TIP (No.2): Get yourself a mat/plastic sheet (as mentioned in my equipment page). If you don't,the fondant will most likely stick to your surface as stress you out!

EXCITING TIP (No.3): Use the rolling pin (as shown in the picture) to life the fondant when you are ready.


Step 5: Place your fondant over the cake and then cut off the excess.

Use the smoother (as shown in the picture and in the equipment page) to smooth any lumps/bumps/cracks.

NOTE: Don't worry if your edges at the bottom aren't perfect... there are small ways to cover these at the end.


Step 6: Trim the top of your cupcakes flat and then turn upside down. Cut out a little dome like you would if you were making a butterfly cupcake (you mind the ones you used to make with your mum and get at school fares?)

Fill with whatever you fancy (jam/nutella/caramel) and then pop the top back on.

Cover with butter cream


Step 7: Cover your cupcakes with fondant. They might be a little bumpy, but as long as you've coated them with butter cream they should smooth out.


Step 8: Cut off the excess fondant.

EXCITING TIP (No.3): Rather than trim it right to the edge, I actually left a little bit of excess and tucked it under. This made it easier to add to the cake later.


Step 9: With your excess coloured fondant, mold the shapes of your Dino heads and tails.

NOTE: Don't get frustrated if the shape isn't perfect on the first shot, I had to play about with sizes/shapes until I got what I wanted.

Its a good idea to do this before you add the Dino body to the cake so you can judge sizes.


Step 10: Add your Dino pieces to the cake.

EXCITING TIP (No.4): To make sure the bodies are secure on the top, you can push a chocolate finger biscuit/mikado/toothpick through the cake (leaving it poking half way out) and slide the bodys over the top to secure.


Step 11: To make the grass, push your excess green fondant through an ordinary sieve. Carefully trim this of and add to wherever you want on the cake.

FINAL EXCITING TIP: The grass comes off easily if you don't secure it to the cake. Use edible glue (or a dab of water if you don't have that).


Step 12: Cut out names and any extra little pieces you want to add; collars with ages, spots/stars on the Dino's back etc.


TAA DAAAAAA!
Read More

Sunday, 26 August 2012

Easy double choc finger cake

I decide to publish this cake first because its a really nice easy one to get started with. The ingredients are simple, and I can whip one out pretty fast...


YOU WILL NEED


1 Cake Board
1 Round cake
Buttercream of your choice
Jam (optional for filling)
2 x boxes of Chocolate Fingers
1 or 2 bags of M&Ms
1 meter of ribbon


Step 1: Make yourself a basic chocolate cake, cut in half and fill with whatever takes your fancy (see my recipes section for sponges and buttercream)

Note: It doesn't need to be a chocolate sponge, but for the sake of the title...thats what I'm using!

Sandwhich the sponge back together.


Step 2: Using a spatula, cover your cake in your chosen buttercream. Its worth moving your cake onto your board/plate/whatever that you're planning on serving it on first; that way you dont have to move it once its been decorated.

Note: If you dont have a spatula its not the end of the world. You can use a knife, it'll just be a bit harder to do.


Step 3: Take your chocolate fingers and wrap them round the full outside of the cake. The buttercream will hold them in place.

Note: The first time I made this cake I seriously underestimated how many chocolate fingers I would need! You'll need at least 2 boxes!


Step 4: Fill with the candy of your choice. I used M&Ms for this one, but I've also used things like Maltesers, chunks of fudge, popcorn etc.

Note:I used one bag of candy to fill my cake, but there's nothing stopping you from filling it to the brim with a second bag.


Step 5: Add your ribbon. I just ran up to the local fabric shop and bought a meter from there, but local supermarkets should also sell ribbon of some sort.


YOU'RE FINISHED!!! Easy!
Read More

Basic Recipes

What cake blog would be complete without a basic recipe page? I'm not a fan of sites that drone on and on about the basic sponge recipe in every step by step guide. I know how to bake a sponge (and you'll end up getting the hang of it soon enough). My blogs, I plan to keep simple; they'll tell you to have your sponge ready before the decorating gets going....it's all about the decorating. So here are a few 'needs' to get you going.

A nice basic vanilla sponge/cupcakes

This recipe can be used for a standard cake or for basic vanilla cupcakes.

You're gonna need...

150g caster sugar
150g butter/stork, softened
150g self-raising flour
2 eggs
2 tsp baking powder
1 tbsp vanilla extract

Make it...

Step 1: Pre-heat oven to 190 degrees Celsius.
Step 2: Mix together the sugar and butter, then mix in the egg. Finally sieve the flour into the mixture with the baking powder.
Step 3: Add the vanilla extra and whisk the full mixture.
Step 4: Pour mixture into a tin (lined with greaseproof paper) or divide into individual cupcakes cases
Step 5: Bake in the oven for 15-20mins until the cake has risen and is firm to touch in the centre
NOTE: I like to test my cake is ready by poking a skewer into the middle. If the skewer comes out dry, the cake is ready all the way through. Just be careful you don't pull the cake out of the oven too early- it will cause it to sink.
Step 6:Remove cake from the oven and allow to cool on a wire rack.

A nice chocolate cake

Moist moist moist ;)

You're gonna need...

60g dark chocolate (coarsely chopped)
120ml water
90g butter/ (I use stork!!!!)
220g firmly packed brown sugar
2 eggs
100g self-raising flour
2 tablespoons of cocoa powder

Make it...

Step 1: Pre-heat oven to 170 degrees Celsius.
Step 2: Combine dark choc and water and stir over low heat until smooth
Step 3: Beat the butter, eggs and sugar in a bowl until light and fluffy
Step 4: Stir in flour (sifted), cocoa powder and water/choc mixture
Step 5: Pour mixture into tin/divide into cases and bake for around 40mins.

NOTE: Its worth testing this cake the same as the vanilla one before you take it out for cooling! This cake can take longer as the water mixture makes the batter runny.

Butter cream

I eat this stuff straight from the bowl.... and LOVE loads of it on cupcakes Ala Starbucks style. So easy..

You're gonna need...

140g butter/stork

280g icing sugar

1-2 tbsp milk
 
Make it...
 
Step 1: Beat the butter in a large bowl until soft. Add half of the icing sugar and beat until smooth.
 
Step 2: Add the remaining icing sugar and one tablespoon of the milk and beat the mixture until creamy and smooth. Beat in the milk, if necessary, to loosen the mixture.
 
NOTE: wanna make choc butter cream? melt down some chocolate and add instead of the milk. Strawberry, add normal supermarket flavouring... etc etc

Read More

Equipment

Before you get yourself all excited about baking, there's some things I think should treat yourself too. Some of them are essentials/things I wish I'd known about when I first started baking, some of them are just things that'll make your life a damn sight easier guys and gals...

ESSENTIALS


1.  Mixing bowl. Pretty self explanatory I'd have thought. Though buy yourself a deep one if you can, because I make a total mess every time I whisk something!

2. Scales. Again, self explanatory

3. Sieve. Do you see a pattern here...

4. Measuring jug. Not as essential, but still handy.


1. Cupcake tray. I got myself a silicone one, just because i wanted to use it for sponge shapes without having to line it with cupcake cases. However, a tin one will do you to get started.

2. Basic round tin. Some supply stores will charge a fortune for these (usually because they have pop out bottoms and non stick features), but you can pick up a good cheap one for a few pounds to begin with.

3. Basic square tin. (As above)


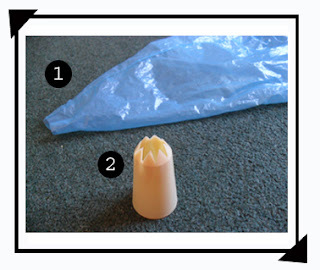
1. Pipping bag. You can buy loads of different shapes and sizes from supermarkets/ cake supply stores. This one only cost me 50p. Once you've bought the bag you cut it to the size you need to fit your nozzle. These are essential for pipping butter cream onto cupcakes.

2. Star shaped Icing Nozzle. The star is the nicest and easiest nozzle to use (In my opinion). Its a good starting nozzle. Don't go for a small one to start with, it'll make it harder.


1. Rolling pins. I didn't get my big one for about a year (they can get pretty expensive for a roll of plastic!). And it came with a lot of rude jokes from my pals!!!

NOTE: Buy a plastic one. Wooden ones stick to your fondant and leave a grain print.


Food colourings... so you think you can colour fondant with normal super market colouring (image 2)....WRONG!!!!

It very rarely works..there's too much liquid and it just makes your fondant go all soggy, and the colours are usually all natural meaning that you get a wishy washy crap colour.

Stick to Gel/Powder colourings (image 1)


NON ESSENTIALS (BUT JEEZO DO THEY HELP!)


1. Plastic mat. So I got this free when I bought a pre-rolled sheet of fondant icing in Tesco, but apparently you can buy proper rubber/plastic sheets now. I swear by this. Your fondant peels right off it after rolling, no scraping fondant off the bunker and cursing yourself!

2. Fondant smoother. Why did nobody tell me about this when I started!? Its a must for smoothing out dents in fondant and generally giving your cakes a nice flat finish.
I almost put this one in essentials!!! LOVE


1. Big sharp knife. You need something that's big enough to cut the whole way through a cake.

2. Bread knife. Sometimes this one works better!

3. Fish Slice. Might seem weird, but are you gonna transfer your freshly butter creamed cake onto the board with your mitts?

4. Spatula. For applying butter cream to cakes. You can use a normal knife, but this is easier.


1. Round and pointed sticks. Great for shaping fiddly fondant shapes and lifting them onto your cake without leaving huge fingerprints.

2. Wooden skewers. I use them for all sorts and re-use and re-use them. For adding edible glue, adding colour to fondant etc.

3. Round cutters. Because cutting out a circle with a knife is a total mare!
Read More

Intro

Lots of people have been asking me where I learned to make cakes... the answer is that I Googled and You Tubed my butt off! I'm self taught, but I found it really difficult to find sites that did step by step photo instructions for a full cake.

So... in this wee blog I hope to do just that for you. simple, simple, simple (well...sometimes)

Please Note: Reading through blogs before, there always seems to be some an angry know it all who has to point out how something isn't right. I don't claim my ways to be the only ways...they're just what worked for me...no haters please :)

Sarah x
Read More

© ThisIsHowIbake, AllRightsReserved.

Designed by ScreenWritersArena