Step by step photo guide to decorating novelty cakes

Sunday, 26 August 2012

Easy double choc finger cake

I decide to publish this cake first because its a really nice easy one to get started with. The ingredients are simple, and I can whip one out pretty fast...


YOU WILL NEED


1 Cake Board
1 Round cake
Buttercream of your choice
Jam (optional for filling)
2 x boxes of Chocolate Fingers
1 or 2 bags of M&Ms
1 meter of ribbon


Step 1: Make yourself a basic chocolate cake, cut in half and fill with whatever takes your fancy (see my recipes section for sponges and buttercream)

Note: It doesn't need to be a chocolate sponge, but for the sake of the title...thats what I'm using!

Sandwhich the sponge back together.


Step 2: Using a spatula, cover your cake in your chosen buttercream. Its worth moving your cake onto your board/plate/whatever that you're planning on serving it on first; that way you dont have to move it once its been decorated.

Note: If you dont have a spatula its not the end of the world. You can use a knife, it'll just be a bit harder to do.


Step 3: Take your chocolate fingers and wrap them round the full outside of the cake. The buttercream will hold them in place.

Note: The first time I made this cake I seriously underestimated how many chocolate fingers I would need! You'll need at least 2 boxes!


Step 4: Fill with the candy of your choice. I used M&Ms for this one, but I've also used things like Maltesers, chunks of fudge, popcorn etc.

Note:I used one bag of candy to fill my cake, but there's nothing stopping you from filling it to the brim with a second bag.


Step 5: Add your ribbon. I just ran up to the local fabric shop and bought a meter from there, but local supermarkets should also sell ribbon of some sort.


YOU'RE FINISHED!!! Easy!
Read More

Basic Recipes

What cake blog would be complete without a basic recipe page? I'm not a fan of sites that drone on and on about the basic sponge recipe in every step by step guide. I know how to bake a sponge (and you'll end up getting the hang of it soon enough). My blogs, I plan to keep simple; they'll tell you to have your sponge ready before the decorating gets going....it's all about the decorating. So here are a few 'needs' to get you going.

A nice basic vanilla sponge/cupcakes

This recipe can be used for a standard cake or for basic vanilla cupcakes.

You're gonna need...

150g caster sugar
150g butter/stork, softened
150g self-raising flour
2 eggs
2 tsp baking powder
1 tbsp vanilla extract

Make it...

Step 1: Pre-heat oven to 190 degrees Celsius.
Step 2: Mix together the sugar and butter, then mix in the egg. Finally sieve the flour into the mixture with the baking powder.
Step 3: Add the vanilla extra and whisk the full mixture.
Step 4: Pour mixture into a tin (lined with greaseproof paper) or divide into individual cupcakes cases
Step 5: Bake in the oven for 15-20mins until the cake has risen and is firm to touch in the centre
NOTE: I like to test my cake is ready by poking a skewer into the middle. If the skewer comes out dry, the cake is ready all the way through. Just be careful you don't pull the cake out of the oven too early- it will cause it to sink.
Step 6:Remove cake from the oven and allow to cool on a wire rack.

A nice chocolate cake

Moist moist moist ;)

You're gonna need...

60g dark chocolate (coarsely chopped)
120ml water
90g butter/ (I use stork!!!!)
220g firmly packed brown sugar
2 eggs
100g self-raising flour
2 tablespoons of cocoa powder

Make it...

Step 1: Pre-heat oven to 170 degrees Celsius.
Step 2: Combine dark choc and water and stir over low heat until smooth
Step 3: Beat the butter, eggs and sugar in a bowl until light and fluffy
Step 4: Stir in flour (sifted), cocoa powder and water/choc mixture
Step 5: Pour mixture into tin/divide into cases and bake for around 40mins.

NOTE: Its worth testing this cake the same as the vanilla one before you take it out for cooling! This cake can take longer as the water mixture makes the batter runny.

Butter cream

I eat this stuff straight from the bowl.... and LOVE loads of it on cupcakes Ala Starbucks style. So easy..

You're gonna need...

140g butter/stork

280g icing sugar

1-2 tbsp milk
 
Make it...
 
Step 1: Beat the butter in a large bowl until soft. Add half of the icing sugar and beat until smooth.
 
Step 2: Add the remaining icing sugar and one tablespoon of the milk and beat the mixture until creamy and smooth. Beat in the milk, if necessary, to loosen the mixture.
 
NOTE: wanna make choc butter cream? melt down some chocolate and add instead of the milk. Strawberry, add normal supermarket flavouring... etc etc

Read More

Equipment

Before you get yourself all excited about baking, there's some things I think should treat yourself too. Some of them are essentials/things I wish I'd known about when I first started baking, some of them are just things that'll make your life a damn sight easier guys and gals...

ESSENTIALS


1.  Mixing bowl. Pretty self explanatory I'd have thought. Though buy yourself a deep one if you can, because I make a total mess every time I whisk something!

2. Scales. Again, self explanatory

3. Sieve. Do you see a pattern here...

4. Measuring jug. Not as essential, but still handy.


1. Cupcake tray. I got myself a silicone one, just because i wanted to use it for sponge shapes without having to line it with cupcake cases. However, a tin one will do you to get started.

2. Basic round tin. Some supply stores will charge a fortune for these (usually because they have pop out bottoms and non stick features), but you can pick up a good cheap one for a few pounds to begin with.

3. Basic square tin. (As above)


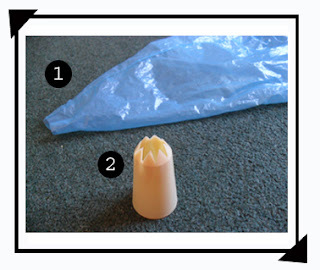
1. Pipping bag. You can buy loads of different shapes and sizes from supermarkets/ cake supply stores. This one only cost me 50p. Once you've bought the bag you cut it to the size you need to fit your nozzle. These are essential for pipping butter cream onto cupcakes.

2. Star shaped Icing Nozzle. The star is the nicest and easiest nozzle to use (In my opinion). Its a good starting nozzle. Don't go for a small one to start with, it'll make it harder.


1. Rolling pins. I didn't get my big one for about a year (they can get pretty expensive for a roll of plastic!). And it came with a lot of rude jokes from my pals!!!

NOTE: Buy a plastic one. Wooden ones stick to your fondant and leave a grain print.


Food colourings... so you think you can colour fondant with normal super market colouring (image 2)....WRONG!!!!

It very rarely works..there's too much liquid and it just makes your fondant go all soggy, and the colours are usually all natural meaning that you get a wishy washy crap colour.

Stick to Gel/Powder colourings (image 1)


NON ESSENTIALS (BUT JEEZO DO THEY HELP!)


1. Plastic mat. So I got this free when I bought a pre-rolled sheet of fondant icing in Tesco, but apparently you can buy proper rubber/plastic sheets now. I swear by this. Your fondant peels right off it after rolling, no scraping fondant off the bunker and cursing yourself!

2. Fondant smoother. Why did nobody tell me about this when I started!? Its a must for smoothing out dents in fondant and generally giving your cakes a nice flat finish.
I almost put this one in essentials!!! LOVE


1. Big sharp knife. You need something that's big enough to cut the whole way through a cake.

2. Bread knife. Sometimes this one works better!

3. Fish Slice. Might seem weird, but are you gonna transfer your freshly butter creamed cake onto the board with your mitts?

4. Spatula. For applying butter cream to cakes. You can use a normal knife, but this is easier.


1. Round and pointed sticks. Great for shaping fiddly fondant shapes and lifting them onto your cake without leaving huge fingerprints.

2. Wooden skewers. I use them for all sorts and re-use and re-use them. For adding edible glue, adding colour to fondant etc.

3. Round cutters. Because cutting out a circle with a knife is a total mare!
Read More

Intro

Lots of people have been asking me where I learned to make cakes... the answer is that I Googled and You Tubed my butt off! I'm self taught, but I found it really difficult to find sites that did step by step photo instructions for a full cake.

So... in this wee blog I hope to do just that for you. simple, simple, simple (well...sometimes)

Please Note: Reading through blogs before, there always seems to be some an angry know it all who has to point out how something isn't right. I don't claim my ways to be the only ways...they're just what worked for me...no haters please :)

Sarah x
Read More

© ThisIsHowIbake, AllRightsReserved.

Designed by ScreenWritersArena